So now that I am engaged (omg yay!) I think I am going to try this blogging thing one more time! We got engaged on May 13 (Friday the 13!) and we are getting married September 21, 2012. We have our wedding venue booked, meeting with a possible photographer on 7/7 and a few of the MANY diy projects I plan on doing started.
Things I plan to DIY:
1. Card box (3/4 of the way done already, post coming on that)
2. Veil (I cannot believe how expensive they are)
3. All the centerpieces for the 20-something tables (our guest list is huge)
4. Candy buffet
5. Escort cards
6. Invitations (I am SUPER excited to make these)
7. Bride t-shirt to wear day-of (yes, I am a nerd)
8. Decorations for ceremony space (yet to be determined)
9. Random other decor for the reception
10. Possibly the runners or overlays for the tables
11. Plenty of other things I cannot thing of right now!
I have the invites already designed, all I am waiting for is hopefully a sale to order all the supplies. The great thing about waiting 16 months to get married is that I have plenty of time to make things myself and bargain/sale shop!
I am hoping I can keep to this blogging thing because I really want to document all the projects I will be doing for the wedding =]
June 24, 2011
February 2, 2011
2011 Project list updated
I think I will post at the beginning of each month what we checked off our 2011 project list. So since it is now February (how did that happen?!?!) here is what we accomplished in January:
1. Turn coat closet into a pantry 1/2011
2. Repaint kitchen
3. Paint living room This is 3/4 done, just to figure out what color to paint the giant wall!
4. Tile kitchen back splash
5. Install new mailbox and post
6. Fix floodlights on the garage
7. Have a yard sale to get rid of unnecessary junk
8. Get guest bathroom shower functioning
9. Repair the shed
10. Hang the mantle
11. Paint the fireplace
12. Install chair rail in dinging room
13. Repaint master bedroom
14. Install crown molding in master bedroom
15. Have family room walls repaired (I'll tell that awesome story sometime) 1/2011
16. Possibly have family room reinsulated-it is insanely cold in the winter While we were having the family room walls repaired we learned that our walls are made of concrete blocks, so there goes my dreams of having it insulated =/
17. Have outlets in kitchen rewired (we can't use both without blowing the fuse)
18. Fix 3-way switches (we have 4 sets of them in our house and NONE of them work properly, talk about annoying)
19. Refinish table from Salvation Army
20. Refinish table given to me from my Grandmother
So we managed to knock off 2 (3?) of the 20 listed so far...not too terribly bad. This month I am hoping to finish painting the living room, paint the fireplace and maybe install chair rail in the dining room! We shall see how it goes =]
2. Repaint kitchen
3. Paint living room This is 3/4 done, just to figure out what color to paint the giant wall!
4. Tile kitchen back splash
5. Install new mailbox and post
6. Fix floodlights on the garage
7. Have a yard sale to get rid of unnecessary junk
8. Get guest bathroom shower functioning
9. Repair the shed
10. Hang the mantle
11. Paint the fireplace
12. Install chair rail in dinging room
13. Repaint master bedroom
14. Install crown molding in master bedroom
17. Have outlets in kitchen rewired (we can't use both without blowing the fuse)
18. Fix 3-way switches (we have 4 sets of them in our house and NONE of them work properly, talk about annoying)
19. Refinish table from Salvation Army
20. Refinish table given to me from my Grandmother
So we managed to knock off 2 (3?) of the 20 listed so far...not too terribly bad. This month I am hoping to finish painting the living room, paint the fireplace and maybe install chair rail in the dining room! We shall see how it goes =]
February 1, 2011
The walls are done!
The drywall guy finished our walls last Friday! Once he was done we were left to do the priming and painting. I think I washed the walls about 3 times and the drywall dust was STILL there in some spots! I finally decided it was good enough and called it a day. Sunday we spent most of the day applying a coat of primer and two coats of delicious chocolate brown paint. I wasn't about to paint the entire room unless I absolutely had too. It is one giant room. So we painted just beyond the edges of where the walls were patched hoping it would blend in well. It doesn't look as good as I hoped, but I didn't think it looked so bad that we needed to do the whole room. I think once we move all the furniture in and hang up pictures and shelves and whatnot it won't be as noticeable.
Here is a sneak peak at the new rug we bought this weekend! (I have waited 10 months to find the perfect rug that wasn't 9 billion dollars):
 Isn't it fab? I sure think so. We picked it up at Lowe's for around $200 (I don't remember how much it was and I cannot find it on the website!)
Pictures coming soon of the completed room!
Here is a sneak peak at the new rug we bought this weekend! (I have waited 10 months to find the perfect rug that wasn't 9 billion dollars):

Pictures coming soon of the completed room!
January 26, 2011
Wall update
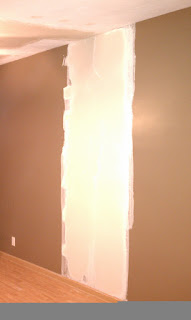
Phil the drywall guy (his official name, obviously) has been working on our walls for two days (well, evenings really). He called what the previous owners had done to them a "homeowners special" because it was so terrible. He thinks that the family room may have been a breezeway between the house and the garage at some point. He said that when the room was finished that the people didn't hang the drywall correctly which is why the walls cracked in the first place. THEN when they did crack they used soooo much drywall mud to "fix" it it made a huge hump in the wall (which is what it looked like when we bought the house), so eventually the crack just worked its way through the mud. Awesome. He said the only way to truly fix the walls and ceiling is to completely tear them out and do it again, which is simply not happening. He said he is doing everything he can to make the cracks not come back again, so lets hope it works! He should be finishing Friday, so that means I can repaint and put my house back together this weekend!
I am beyond excited to finally be able to hang my floating shelves and awesome prints I bought many months ago! Here are some during shots of the repair process =]
This is the wall where the TV was in the picture from the last post about this.
 He also helped us out by fixing the cracks under this window.
 Wall opposite the first picture.
 ps- I have NO idea why my pictures have that crazy gray strips at the bottom, anyone have any clue? I just uploaded them from my phone to Picasa and Picasa to here...
I am beyond excited to finally be able to hang my floating shelves and awesome prints I bought many months ago! Here are some during shots of the repair process =]
This is the wall where the TV was in the picture from the last post about this.


All about me =]
I think I should probably introduce myself a little bit...so here we go!
My name is Katie. I work for my family business....I like my job but my real passion is in decorating and creating beautiful/awesome things. I think I am awesome, I hope you do too (=p). I use way too many !!!! and =] so I hope you don't mind. I live in Cincinnati. I bought my first home with my amazing boyfriend (soon to be fiancé I hope =]) in March of 2010 and I am throughly enjoying fixing it up and making it our home. We have two dogs, Kip-Great Dane mix and Blade-Cocker Spaniel/Dachshund mix, and two cats, Sampson and Bojangles. I drive a Scion xB...Most people think they are ugly but I LOVE my car and think it is amazing. I am extremely impatient (hence the blog name =p) and sometimes it gets me into trouble. I love shopping a bit too much. I have a sickening love for Christmas music and decorations, and well, just Christmas in general =]
Very random, I know, but that is just me!
January 24, 2011
My walls crack me up...
That's a lie, they crack themselves up. See?
 See that lovely crack there? Imagine that traveling all across the ceiling and down the other wall. And add the wall under the window doing the same thing. It's awesome. Not. When we purchased the house that part looked just like someone had done a bad patch job, but not cracked at all. Which is why we went ahead and painted. Then it cracked and traveled all the way across the room. We have a guy starting tomorrow to fix them and I could not be more excited! I'll post before and after photos of all the walls/ceiling. Once he is done I can FINALLY hang up my floating shelves.
Also, we finally painted the living room. Well 3/4 of it anyway. I cannot decide on a color for the giant, first thing you see when you walk into the house wall. The kitchen is dark gray, the kitchen is cream and red...I am lost on what color to paint it.
Now I'm off to make my house presentable before the repair man comes tomorrow!
January 20, 2011
Silhouette love.
Have I mentioned how much I love my Silhouette? =P Lol. But for real...I doooo. I found a website that sells 9x24 inch sheets of vinyl! Rolls of vinyl for it are about $8, which isn't too terribly bad, but if I want just a little but of a certain color I don't want to buy a whole roll! So yay! 9x24 sheets! Each sheet is $1.59 which is totally reasonable. Click here to check it out. It is technically more expensive when it comes down to it, but like I said, if you just want a little piece it's reasonable. Here is what I ordered on Tuesday:
 Along with the 7 colors of vinyl sheets, I also ordered 2 replacement cutting mats for the machine. I hate paying shipping with a passion so I figured if I was already ordering vinyl I might as well go ahead and get the mats.
I when I was searching for my brad setting tool (idk the official name of the tool) I found a whole roll of red vinyl I completely forgot I had! I love when that happens =]. So since I found this whole roll I figured I would make some Valentine's Day decorations!

 These plate holders are on either side of a mirror that hangs above my buffet in the dining room. The plain gold chargers were looking a little boring, but now they are as cute as can be! As soon as V-Day is over I can just peel the vinyl off and do something else! I also read somewhere that you could use clear contact paper instead of the special transfer paper! And it's soooo much cheaper!
I love crafting on days like today. We are currently getting snowed in and I am making chicken n dumplings for dinner. Yummmmm.

I when I was searching for my brad setting tool (idk the official name of the tool) I found a whole roll of red vinyl I completely forgot I had! I love when that happens =]. So since I found this whole roll I figured I would make some Valentine's Day decorations!


I love crafting on days like today. We are currently getting snowed in and I am making chicken n dumplings for dinner. Yummmmm.
January 17, 2011
Valentine's Day Banner
I love that our house has a fire place. What I don't love is that it has no mantle. We have plans to build one, someday. So since I have no mantle to decorate I have been making banners with my Silhouette to string across the fireplace.
Here is the one I just made for Valentine's Day
 (Sorry the pic is so crappy, on either side of the fireplace is the front door and a window which is why it is so bright (and not in a good way!) I should really get a good camera =p)
Can I just say how much I LOVE my Silhouette? I bought it in November and I could not be happier with it. I bought mine with a special promotion code which got me a sweet deal. Right now House of Smith's is doing a Silhouette giveaway and also have a promo code to buy a Silhouette if you want! So click here to check it out!
OK, so here are a few pics on how I made my banner =]


Here is the one I just made for Valentine's Day

Can I just say how much I LOVE my Silhouette? I bought it in November and I could not be happier with it. I bought mine with a special promotion code which got me a sweet deal. Right now House of Smith's is doing a Silhouette giveaway and also have a promo code to buy a Silhouette if you want! So click here to check it out!
OK, so here are a few pics on how I made my banner =]


I just cut out the appropriate amount of slider pieces and the same number of top pieces. I love the way this turned out because the slider part is hidden. I added letters cut out of flocked vinyl, strung the slider parts on the ribbon, then glued on the front heart with the letters. I have one of those 3m Command hook things hung on either side of the fireplace, so I just tied a loop in the ribbon and hung it up! This project was tons of fun and really easy. It took a bit of time because I had to cut out 36 hearts then put it all together. I'm sure this project could be done using pre-cut hearts or even if you cut them out yourself! I don't have kids (yet) but this would be a fun project for kids.
January 13, 2011
I've Got Swag...
...well, at least my chandelier does. Changing out the dining room light fixture was one of the very first things we did when we bought the house. I don't think I even left it up long enough to snap a picture! It had glass pieces hanging from a single hole on each piece on a brass monstrosity. I don't know how to describe it any better than that =]. It also had missing pieces. I looove the new light. We picked it out at Lowe's, I believe it cost somewhere around $230. I didn't take part in the installation of it, but I don't remember it being hard for them to replace. So then we had this pretty new chandelier that we adjusted to the correct height above the table, but it hung almost directly above the left side! When we have the leaf in our table seats 8-10 people, so one side the lighting is nice and bright and on the other side it is not. Little did I know you could just "swag" the light over with a $6 hook and then all is right in the world dining room. Last month we picked up said hook, it was self tapping (I think that's the right term), we measured, Mat climbed the ladder to the very high ceiling and less than a few seconds later we had a perfectly centered chandelier! I think the whole project took us under 10 minutes, which included moving the table out of the way and back.
 (Again, sorry for the crappy cell pic, my camera is acting up)

Messy, messy garage
One of the big reasons we chose the house we did was because it had a two car garage. We have now lived there 10 months (and 1 day =p) and we have yet to be able to park 2 cars in it! My car has made it in there 3 times I think, but yet again, there is no room for it. Here is my problem, I refused to take anything into the house until that room was finish being painted. So everything sat out there forever, we have mostly finished painting, but yet we have not gone through the boxes! I think this is something we will try to tackle in the very near future! I am tired of my car being covered in snow and ice, and it is only January, so there is MUCH more snow and ice to come.
 This is just a glimpse at part of the mess! (sorry for the crappy phone pic!)

January 7, 2011
Random House Projects
Over the past few months we have accomplished a few house projects that don't quite deserve their own post so I am going to lump them all together in this one!
Project 1: Change out ugly front porch light
I have hated the front porch light since we moved in. It was old, ugly and brass. We finally bought a new light, waited a few months (because that's how we roll), then finally installed it.
Before:
 After:

 So much better! The color of it matches the house better also. It makes me smile every time I see it =]
Project 2: Make (well, have my mother make) curtains for the kitchen window
I went shopping for fabric for kitchen curtains knowing I wanted something black/gray/white color scheme. I ended up buying $40/yard outdoor fabric on sale for $5/yard! Outdoor fabric is the same weight/texture as a lot of home decor fabrics (or so I was told), the pattern was awesome and the price was amazing! So a yard or two of fabric, a tiny tension rod from Big Lots and I had a pretty kitchen window!
 Lovely!
Project 3: Kitchen decor
One of my favorite things to do is "treasure hunt" aka Goodwill/thrift shop. I usually go on Sunday mornings with my mother so I can get the senior 50% off sale. We found these awesome mini plates for just $1.50! And they were brand new in the box! I think they looks super fantastic =]

Please excuse the ugliness that is my cabinets with the see through cabinet doors. That shall be fixed soon (I hope).
Well, that is all for now!
Project 1: Change out ugly front porch light
I have hated the front porch light since we moved in. It was old, ugly and brass. We finally bought a new light, waited a few months (because that's how we roll), then finally installed it.
Before:


Project 2: Make (well, have my mother make) curtains for the kitchen window
I went shopping for fabric for kitchen curtains knowing I wanted something black/gray/white color scheme. I ended up buying $40/yard outdoor fabric on sale for $5/yard! Outdoor fabric is the same weight/texture as a lot of home decor fabrics (or so I was told), the pattern was awesome and the price was amazing! So a yard or two of fabric, a tiny tension rod from Big Lots and I had a pretty kitchen window!

Project 3: Kitchen decor
One of my favorite things to do is "treasure hunt" aka Goodwill/thrift shop. I usually go on Sunday mornings with my mother so I can get the senior 50% off sale. We found these awesome mini plates for just $1.50! And they were brand new in the box! I think they looks super fantastic =]

Please excuse the ugliness that is my cabinets with the see through cabinet doors. That shall be fixed soon (I hope).
Well, that is all for now!
January 6, 2011
2011 Home Improvemt Projects
We have sooo many projects that we would like to do around our new home, but I have to keep reminding myself we have only lived here a few months, we are young and we have the rest of our lives to work on our home. I always want things right now.
Here is my 2011 list of projects I want to accomplish around our home:
1. Turn coat closet into a pantry
2. Repaint kitchen
3. Paint living room
4. Tile kitchen back splash
5. Install new mailbox and post
6. Fix floodlights on the garage
7. Have a yardsale to get rid of unnecessary junk
8. Get guest bathroom shower functioning
9. Repair the shed
10. Hang the mantle
11. Paint the fireplace
12. Install chair rail in dinging room
13. Repaint master bedroom
14. Install crown molding in masterbedroom
15. Have family room walls repaired (I'll tell that awesome story sometime)
16. Possibly have family room reinsulated-it is insanely cold in the winter
17. Have outlets in kitchen rewired (we can't use both without blowing the fuse)
18. Fix 3-way switches (we have 4 sets of them in our house and NONE of them work properly, talk about annoying)
19. Refinish table from Salvation Army
20. Refinish table given to me from my Grandmother
There are a few things that we want/need done but may or may not happen this year (probably not)
1. New fence
2. New windows throughout the whole house (all 14 of them)
3. New french doors in family room
I know there are plenty of other things we will work on this coming year, but those are the ones I could think of right now!
Wish us luck!
Here is my 2011 list of projects I want to accomplish around our home:
2. Repaint kitchen
3. Paint living room
4. Tile kitchen back splash
5. Install new mailbox and post
6. Fix floodlights on the garage
7. Have a yardsale to get rid of unnecessary junk
8. Get guest bathroom shower functioning
9. Repair the shed
10. Hang the mantle
11. Paint the fireplace
12. Install chair rail in dinging room
13. Repaint master bedroom
14. Install crown molding in masterbedroom
15. Have family room walls repaired (I'll tell that awesome story sometime)
16. Possibly have family room reinsulated-it is insanely cold in the winter
17. Have outlets in kitchen rewired (we can't use both without blowing the fuse)
18. Fix 3-way switches (we have 4 sets of them in our house and NONE of them work properly, talk about annoying)
19. Refinish table from Salvation Army
20. Refinish table given to me from my Grandmother
There are a few things that we want/need done but may or may not happen this year (probably not)
1. New fence
2. New windows throughout the whole house (all 14 of them)
3. New french doors in family room
I know there are plenty of other things we will work on this coming year, but those are the ones I could think of right now!
Wish us luck!
Coat closet turned pantry!
As far back as I can remember I have dreamed of having a pantry. I love our kitchen, it has a pantry-ish cabinet with slide out drawers, but it is definitely too small. We have a coat closet right outside the kitchen that was rarely used and was turning into a junk collector. One day when I was pouting that I had no pantry and no place to store extra stuff and it hit me! Turn the coat closet into a pantry! I have no idea why it took me 6 months to realize what a brilliant idea that was. It only took me another 3 months to make it actually happen. But alas- it is done, and it is glorious. Just imagine, a place to store extra food and supplies. No more running to the store for tp because we ran out? No more eating out every night because there is nothing to eat in the house? What a great concept.
I do not have a before picture because I just started ripping it apart without thinking. So here we have the during and after shots:
During:


After!:

Isn't it amazing? I would like to think so. It still needs one more shelf so that's why the spacing of the shelves is wonky. We thought painting it a bright fun color would be exciting. The door will be shut 99% of the time and every time I open it, it will make me smile =].
Instead of buying the expensive shelves made to go on the brackets, we just had wood cut to size and covered it ourselves with checkered contact paper. Had we bought the shelves it would have cost somewhere around $80 instead of the $25 we spent on wood.
Let me tell you something about myself, I am a bit of a perfectionist, yet I am extremely impatient. Oxymoron much? I think so. So after my rampage tearing out the shelves and rod, I patched the holes and almost immediately painted. Bad idea. I didn't wait long enough for the spackle to dry, and I didn't prime the areas where the shelves had been. So I got to re-spackle the holes, prime those areas, and paint again! In the end it was worth it (though I should have taken the time to do the proper steps in the first place). I LOVE my pantry. I have grand plans for awesome containers for my dry goods (flour, sugar and whatnot) but I sadly do not have unlimited cash, so they will have to wait.
Cost breakdown:
Paint (I had to buy a second quart because my impatientness)-
Tracks-
Brackets (12)-
Wood for shelves-
Contact paper-Free! (leftover from when we covered our nasty apartment shelves)
I do not have a before picture because I just started ripping it apart without thinking. So here we have the during and after shots:
During:


See the two stripes going around there? That would have driven me insane.


After!:

Isn't it amazing? I would like to think so. It still needs one more shelf so that's why the spacing of the shelves is wonky. We thought painting it a bright fun color would be exciting. The door will be shut 99% of the time and every time I open it, it will make me smile =].
Instead of buying the expensive shelves made to go on the brackets, we just had wood cut to size and covered it ourselves with checkered contact paper. Had we bought the shelves it would have cost somewhere around $80 instead of the $25 we spent on wood.
Let me tell you something about myself, I am a bit of a perfectionist, yet I am extremely impatient. Oxymoron much? I think so. So after my rampage tearing out the shelves and rod, I patched the holes and almost immediately painted. Bad idea. I didn't wait long enough for the spackle to dry, and I didn't prime the areas where the shelves had been. So I got to re-spackle the holes, prime those areas, and paint again! In the end it was worth it (though I should have taken the time to do the proper steps in the first place). I LOVE my pantry. I have grand plans for awesome containers for my dry goods (flour, sugar and whatnot) but I sadly do not have unlimited cash, so they will have to wait.
Cost breakdown:
Paint (I had to buy a second quart because my impatientness)-
Tracks-
Brackets (12)-
Wood for shelves-
Contact paper-Free! (leftover from when we covered our nasty apartment shelves)
Subscribe to:
Comments (Atom)